Hi everyone! Time for another tutorial and today I would like to show you a tutorial for the card I made for our Marvelous Monday using the "Beary Much Love" image.
Before we start I want to thank Valita from
Valita's Fresh Folds Blog for the inspiration. Her blog was my first introduction to the "Front Fold Card". After that I knew I had to make one too. Below you can find my tutorial for making the card. My card measurements are a bit different than Valita's and I made a few other changes that I think give great results in the final card.
So...let's get started. All you really need for the card base is a piece of cardstock measuring 10 x 7 inches and a score tool of some kind. I used my Scor-Pal.
Start by scoring at 5 inches along the 10 inch side. This score will become the top of your card. Fold along score line.
With the fold of the card at the top mark 3 1/2 inches from the side along the bottom of the card. Now using the score tool score from the top right corner to the mark you made on the bottom of the card. Repeat and score from the top left corner of the card to the mark you made on the bottom of the card.
Now measure 1/4 inch down from the score line you just made. You will want to place a pencil mark at the side and bottom edge so that you can line it up on your score tool. Repeat this measurement on the other side of the card. Now score between your two marks.
We now have the top set of scores made. Ok, ok...you are wondering why we score each line and then measure? Why not do all of the measurements at once and then do all of the scoring. After 4 attempts I found that this technique gives a more precise measurement and fold. When I tried doing all the measuring and all the scoring I got a card that was a little lopsided.
Now lets begin the bottom set of scores. Measure 2 1/2 inches down from the top fold of your card base and mark. Be sure to repeat for the other side. This mark will be the upper part of our next score line.
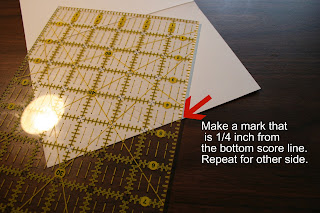
For the lower part of the score line we will measure 1/4 inch from the bottom (mark at bottom only) of last score line that we made. Repeat by marking the other side 1/4 inch from the bottom of the last score line. Make a diagonal score line from the mark on the side of your card to the mark at the bottom. Repeat for the other side. Score from mark on the side of the card to the mark at the bottom of the card. Remember to score both sides.
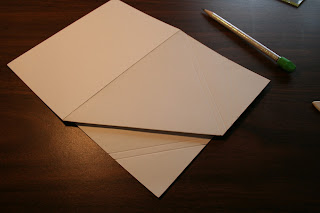
This picture shows those score lines completed. (Yep....I goofed. If you look closely I have some score lines that aren't right. Remember I said this was my 4th try at this card so all the diagonal lines were starting to blur together a bit. :) )
Last set of lines! :) Measure 1/4 inch down from the last score line you made. This time we will be marking 1/4 inch from the last score on the side and 1/4 inch from the last score on the bottom. Repeat for the other side. Score along your marks.
All of our scoring is done!!! In this picture you can see all of the completed score lines. I have also labeled what type of fold that you will do at each line. Basically the folds "accordion" back and forth starting with a mountain fold at the top score on each side.
This picture shows our first completed mountain fold. Be sure to use your bone folder to make a nice crisp fold at each line.
Our second fold is a valley fold which brings the flap back to the front.
The third fold is another mountain fold.
And the final valley fold. All of our folds are now done on one side. At this stage I used the bone folder again to press all of the edges. Now repeat for the other side.
All of our folds are done and we have a very elegant front to our card. From here you can decorate any way you like.
I chose to put some patterned paper under the front fold to give it a little more dimension. I chose Doodlebug Designs Paper called ladybug daisy-stripe. The measurements of this paper are 6 1/2 by 4 1/2. I used the strip for the piece on the front. Use adhesive to attach this to the front flap any way that you like. I ran a line of adhesive along the top edge and then used a glue dot down near the point of the front folds.
With the daisy side of the paper showing I added paper to the inside of my card. The measurements of this piece are 6 3/4 by 4 3/4. I cut out my image using my new Nestabilities. And matted the image in red cardstock. I colored my image using Copics. The colors I used for "Beary" were E29, E57, E35, Y21, E51. I added i-rock gems to the three corners of the top fold and I inked the edges of the fold for more dimension.
I hope you enjoyed this tutorial and I really hope you will give this card a try. If you do try it we would love to see your projects.


