Showing posts with label Card Tutorials. Show all posts

Tuesday, April 2, 2013

Tutorial Tuesday - 3D Card - Another Version

I have had such fun looking through blogs lately at amazing tutorials.  Needless to say there is SO much inspiration out there.

My project today was inspired by a project that I saw from Crafty Kate.  I loved the 3D effect given by the layers and thought I had to give something similar a try for my "Field of Dreams" project.  I have also been getting SO MUCH inspiration from one of my favorite new blogs called Contadina K.  Vivian has tutorials that are SO much fun to watch.  The "watercolor" technique that I share with you in this video is inspired by her videos.


Whew, I was so out of practice filming videos. If you have trouble viewing the video above please click this link.

As I mentioned in the video we are going to offer you the frames I used for my project.  

If you use Make the Cut you can download this file - http://www.4shared.com/file/plMf_G9C/shellysimagescom-circleframefi.html

The following .jpg are great to use as templates.  Just insert the files into a Word document.  Be sure to adjust the size for your project.  Then print and use as a template.  Or, feel free to use your cutting machines and import the file as a pixel trace.


Sunday, December 9, 2012

On the 9th Day of Christmas

 
Today it is my turn you show you something during this fun 12 days of Christmas. I've made a tutorial for you of a book card.
You need:
- cardstock
- design paper
- scoring board
- border punch
- ribbon
For the book inside you need 4 pieces of cardstock. 2 of 24x12 cm (9.46x4.93 inch) and 2 of 24x14,5 cm (9.46x5.71 inch).

 For the card you need a piece of cardstock of 15x29,4 cm (5.91x11.58 inch).
Score at 13,7 and 15,7 cm (5.4 and 6.19 inch).

Score the 4 pieces of cardstock at every 2 cm (0.79 inch). Make a decorative edge at the end of every strip with a border punch.
 
Fold the strips like an accordion. Make sure that every fold is straight!

  
If you want you can ink the edges.
  Now comes the hard part. That is putting it together.

Stick a short strip and a long strip together. Make sure that the long strip is on top.

Glue the short side on top and then the long side.

Also glue the back side together.

 
Do this with the other 2 strips and then put the 2 parts together so you get a frame.
Front
Back

Before you put the in the card you glue the ribbon on the insides of the card.


Now you decorate the inside of the card with design paper and glue the frame in the card.


Now just decorate the bookcard and you're finished.


Today with our tutorial we are also giving you this set of "To: From" sentiments.  These sentiments will be available for download from now through December 12th.  Remember...sharing freebies is not allowed, but please do send your friends to our blog to get their freebies.
Sorry...our Freebie Event has expired

Hope you enjoyed this tutorial.  If you are downloading our freebie or using the tutorial please leave us a little comment.  We love hearing from you.


Hugs Miranda

Tuesday, December 4, 2012

On the 4th Day of Christmas


 We are sharing this quick & easy Gift Card Holder with you that will be very helpful this holiday season!

By using Shelly's Images PRECOLORED "One Last Stop" digi image, you can have all your gift card holders done in no time at all!
Let's get started!

Here are the materials you will need:
  • 1 piece of card stock cut 8 1/2" x 4 7/8"
  • design paper cut to three sizes ... (1) 4 3/4" x 2 7/8" for front cover (2) 4 3/4" x 1 7/8" for inside and lower front flap
  • 1/8" Scor Tape (or red line tape)
  • Shelly's Images precolored image
  • embellishments of our choice

STEP 1:  After cutting your card stock (base card) to 8 1/2" x 4 7/8", score it at 2" and 5 1/2"

 STEP 2:  Cut designer paper to 4 3/4" x 2 7/8" and adhere to card front.  (This is a great way to use up those scraps.)
 

STEP 3:  Cut designer paper to 4 3/4" x 1 7/8" for the lower portion of the card front as well as the inside top panel.  (This way you will easily see the edge of the gift card enclosure panel. )

STEP 4:  Position a strip of 1/8" Scor-Tape to the left & right sides of the INSIDE of the lower panel.

STEP 5:  Adhere lower panel to inside back panel and your gift card holder is ready to decorate!

STEP 6:  Print & mat Shelly's Images PRECOLORED "ONE LAST STOP" digi image and adhere to your card front.  Add embellishments & sentiments to your liking!  VIOLA!  DONE!

ONE LAST STOP COLORED VERSION
 Be sure to stop back tomorrow for DAY 5 of our 12 Days of Christmas for more crafting fun! OH!  and if/when you make your gift card holders using Shelly's Images ... PLEASE stop back and share the link ... we'd LOVE to come to your blog and see your creations!  Happy Holidays!

HAVE FUN!
Shelly's Images Elf in Training!
Darlene

Tuesday, September 4, 2012

Tri Shutter Card Tutorial

Welcome to another Tutorial/Technique Tuesday 
here at Shelly's Images.

I know you've seen this fancy fold card tutorial around the internet but it's worth showcasing once again.
It's the TRI-SHUTTER FOLD CARD.

I have made several of this type of card for this fall's craftshow ... it always carries that WOW! factor.

LET'S GET STARTED!
You can created TWO Tri-Shutter cards from
ONE 12x12 sheet of cardstock
(at least 80# weight or more is best for this style).  

For your base you will need to cut your 12 x 12 paper
at 5-1/2" x 12".
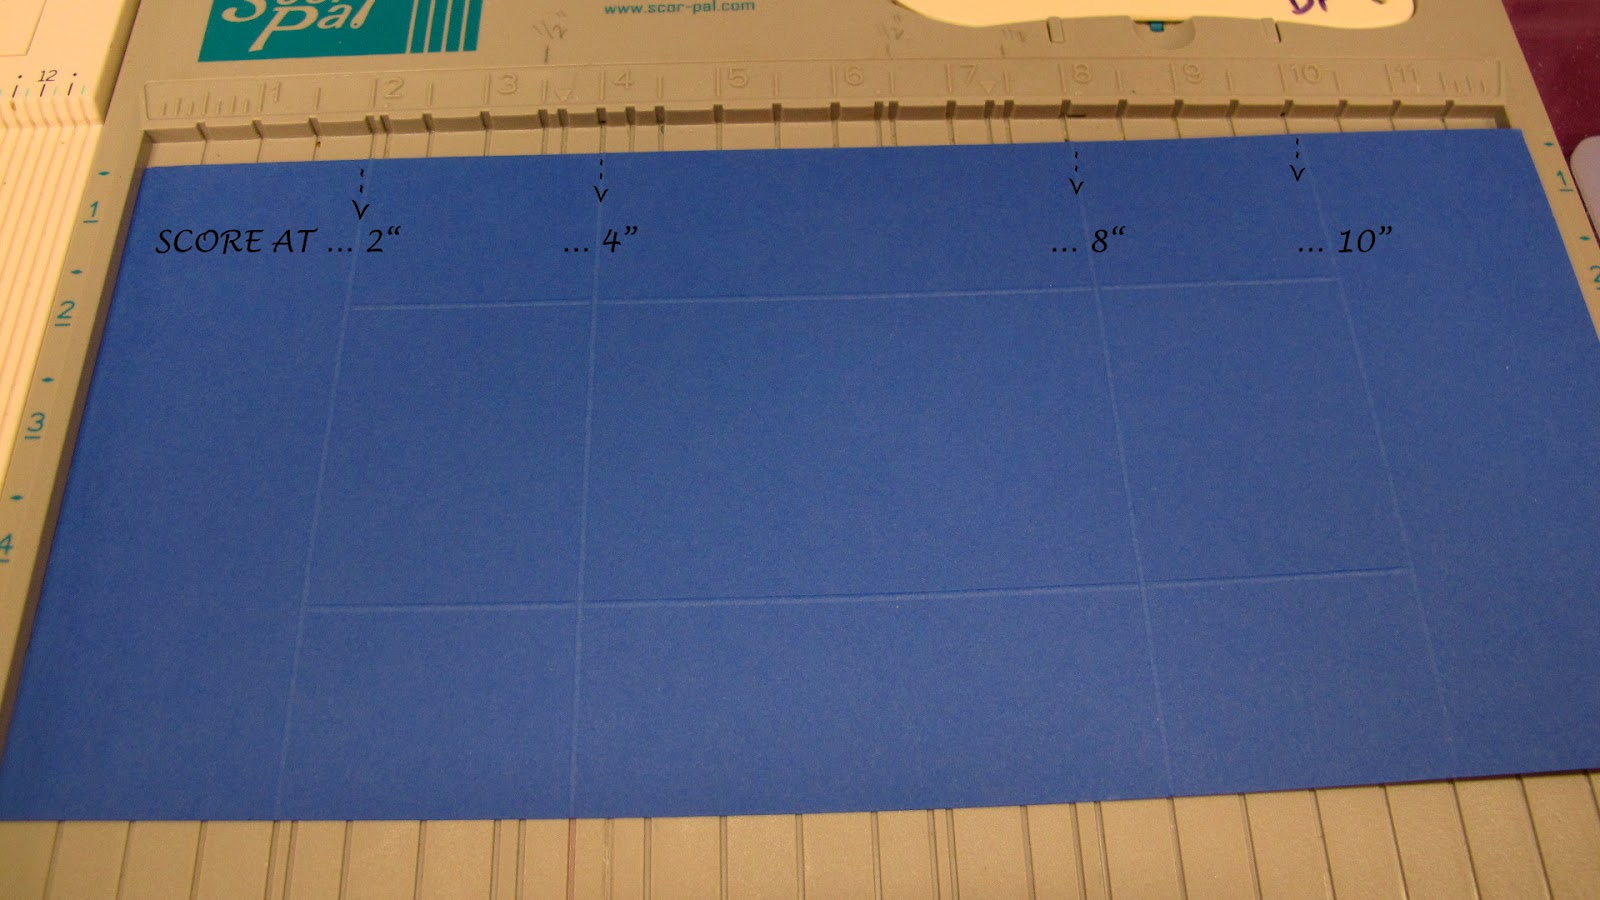
Then with your 12" length across your Scor Pal,  
score down at 2", 4", 8", 10".

Next you will need to TURN your paper,
and 1-1/2" in from each side you will CUT 
between the 2" & 10" Score Lines.

(HINT:  I score my line first ... then use my craft knife and cut down through the score line.)

Now accordion fold your score lines ...
REVERSE the fold on the middle panel ...
It will look like this, looking DOWN on it ...


Now it's time to choose & cut your design panels.
 (HINT:  I have made myself a template and marked the dimensions for the inside panels on each section ... that way I don't have to read over again & again from my notes or remeasure each time.)

 Today I'm making a children's birthday card using  Winnie-The-Pooh so I'm going to use cardstock panels that match the rub-on stickers I have to decorate the card with.


AND HERE'S MY FINISHED CARD!
Isn't it cute?
BELOW is the card closed ...
You will notice that when you close it, the two 'inner' longer panels do show  ... which means that I should have positioned Eeyore more to the right on the top panel ... and maybe cut my sentiment panel so just the word 'friends' showed on the bottom panel.

SEE THERE ... we are learning together!!!  LOL!!

(NOTE TO SELF:  look at the card in 'closed' position before adhering characters!) 


Well that's my tutorial for you today!
I hope you'll give this fancy fold a try, then come back and share it with us!

PLEASE BE SURE TO COME BACK THURSDAY FOR ANOTHER FUN CHALLENGE!

Have a FABULOUS, FUN day!

Tuesday, June 19, 2012

Tutorial/Technique Tuesday

Hello ... Darlene here (again!)

Do you remember a few weeks back when I "ooops, forgot to use the CHALLENGE THEME on my DT creation?" ... Well, Iron-Fist Shelly is MAKING ME PAY for that little screw-up
by doing HER tutorial/technique Tuesday SPOT today!!  
Can you believe that!  
What a slave driver!

All joking aside, Shelly has her hands full at home right now so I 'offered' to do this for her!
(She's really not a meany ... I just said that! Teehee!)

SO --- On To Today's Tutorial!

Let' do another Fancy Fold Card ... this time:
DOUBLE DUTCH FOLD

You will need TWO panels for this card.

Panel "A" is 4-3/16" x 9"  ... scored at 5-1/2"
Fold at the score line and set aside.


Panel "B" is 2" x 8-1/2" long and scored at 2-1/8" and 6-3/8"
Fold at score lines.


The lower portion of Panel "A" will be adhered to the INSIDE of Panel "B" and the sides will fold in to give that 'door' effect.


That is the basis of the card design ... now you can decorate it to your needs & liking!
I have created a THANK YOU card using TWO of Shelly's Images.


 Here is a peek at the inside of my card.
I've added a simple SU verse onto a Spellbinder Classic Circle panel. And finished the inside bottom with a little floral stamp by Repeat Impressions.


 Here's a little closer view of the detail.
I created my decorative panel for the front cover of my card then printed Shelly's "thank you sentiment" onto it.  I've colored the basket with Prismacolor markers then added Prima flowers with Kaiser pearl centers, Wedding satin flowers from JoAnn's and created my greenery using the MS 'branch' punch and the Cheery Lynn Designs B119 'Tropical Leaves' die.

I hope you've enjoyed today's tutorial and will give it a try.  Remember, if you do, we'd LOVE to see your creations ... be sure to pop back here, comment & leave us a link.

Well I guess I'd better get back to working on MY card for this week's challenge before 'Ole Iron Fist' gets after me!  LOL!  (just joking Shelly ... you're the BEST!)

Be sure to come back on Thursday for our TTT Challenge when SHELLY will be hosting!
Hope to see you then!
HUGS,
Darlene

Tuesday, June 12, 2012

Three Fold Card Tutorial

It's time once again for Tutorial/Technique Tuesday here at Shelly's Images.

Today I'd like to share another fancy fold card design with you.
It's the THREE FOLD CARD ...

You will need TWO pieces of card stock (or design paper) to make a Three Fold Card.  Your FIRST piece of paper will be cut 8 1/2" x 5 1/2" and scored to make the sides meet in the middle.  If you have a Scor-Pal there are score lines already marked for you (see next photo) to achieve equal sides.


See the DOTS next to the 2 and close to the 6 1/2?  
Those are the score lines you will follow to achieve this 'gate' fold. 


Your SECOND piece will be cut 4 1/4" x 9 1/8" and scored at 5 1/2". This piece will be adhered to the back of your 'gate' folded card and the short flap will come down over the front.  I chose to BORDER PUNCH the front flap for extra character.


 Now you can decorate it anyway you would like!
Here is my finished card . . .


The design paper used for my card is from the Graphic45 Le' Romantique 8x8 pack (2 sided).  My inside sentiment is from the Shelly's Images 'Key To My Heart' stamp set.

This is such a fun, fancy fold to create and can be decorated in so many ways ... for so many occasions!
I hope you'll give it a try and please let us know if you do ... we'd love to come to see what you create!

Have a fabulous day and be sure to stop back on Thursday for our next Terrifically Thrilling Thursday Challenge and meet my Special Guest Designer!  See you then!

Darlene
PROUD member of the Shelly's Images DT!