Hi Everyone!
TGIF!!!
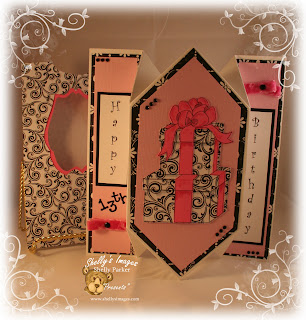
It has been awhile since we offered a Fabulous Freebie Friday so I thought I would share three files that I made for a project for my daughter Taylor's 13th Birthday.
The first file is a sentiment. This sentiment is great for many projects, but also works perfectly for this Diamond Fold card. If you would like to know how to make your own Diamond Fold card you can visit our tutorial here.
Sorry....our freebie event is now over. Thanks to everyone who stopped in and enjoyed our freebie and left us a wonderful comment!
Our second freebie today is the template I used to create the pouch for my daughter's birthday card. If you use Word be sure to download the file because it is perfectly sized for the dimensions of the diamond fold card and ready to print. The Word file also contains the frame file. Again perfectly sized and ready to print.
Here are a few quick tips for using our Pouch Template.
I always print my items on plain paper before printing on patterned paper. I folded my trial template on the middle fold just to be sure that my project was going to fit inside easily. This template is designed to print on an 8 1/2 x 11 inch piece of paper on the landscape setting.
Now I am ready to print the template on the back side of the paper that I am using for my pouch.
Cut as many lines as you can using your paper trimmer. Then scissor cut the other areas. Now use your scoring tool to score along the 3 dotted lines on the template.
I folded the pouch inside out and cut both of the notches at the top of my pouch at the same time. This just ensures that they are a perfect match on my finished pouch.
I am going to use my frame template to make a cut out in the front of my pouch. I am using carbon paper to trace the larger outline onto the wrong side of the front panel of my pouch. Caution!!! Carbon paper loves to smudge and smear. I prefer to use the carbon paper that is made for sewers and pattern makers. It comes in lighter colors and doesn't smear so bad. I just didn't dig that far in my file today.
This picture shows the pink frame added to the opening. Remember you are actually using the cut out part as a window so be sure to leave extra space around the pink frame for gluing it inside of your pouch.
Next fold the pouch on the score lines. Be sure that your flaps don't show through your window after you fold everything. If they do then just trim them a little. I like to fold the bottom up, then the side flap and then use adhesive to glue the back panel down. In other words the flaps are glued inside the back panel.
I used Shelly's Images "Presents" digi for my project. You can get that project from now through Sunday at 1/2 price. Don't miss this opportunity to get this wonderful digi at such an amazing price.
If you enjoyed today's freebies, please thank us by leaving a little note. We love hearing from our friends.
And remember. Sharing freebies is not allowed. But please send all of your friends in to get their own copy of the files we are offering today.


thank you grt jans
ReplyDeleteWow Shelly, thank you so much for these fabulous freebies! This is an incredible card and envelope...I'm sure your dd must have just loved it. And thanks for the tutorial, I probably wouldn't have been able to figure that one out without it lol.
ReplyDeleteGreat pouch for a diamond fold card! The end result is gorgeous!
ReplyDeleteThank you, this is wonderful! Love your card and the freebies are awesome!! Thank you also for the tutorial. It will make making this project much easier.
ReplyDeleteThank you this is wonderful love your card and the tutorial:) Sandra H
ReplyDeleteLooks neat! Thanks for the freebies.
ReplyDeleteThanks so much for sharing these images and the tutorial with us today!
ReplyDeleteThank you so much!
ReplyDeleteSomething new to accomplish. Thanks. I love learning.
ReplyDeleteWow, I am so thrilled that I visited your blog today. Thank you for the templates, tutorials, sentiment and inspiration. Have a wonderful weekend. Hugs
ReplyDeletethank you! I've always needed a vertical HB sentiment and don't have the patience to do it myself.I will use this a lot!!!
ReplyDeleteThank you for the envelope and frame. I love your diamond fold card.
ReplyDeleteThanks Been looking for that B-day up and down!
ReplyDeleteThank you for the great sentiment and templates!!
ReplyDeleteThanks Shelly!
ReplyDeleteGreat sentiment and template.
ReplyDeleteTYFS
Thank you for sharing both the sentiment and the card holder.
ReplyDeleteI love the card and the template is awesome but i couldn't download it because I have an Apple I Mac but thank you for thinking of us. hugs Cathy K
ReplyDeletehttp://cathyshappiness.blogspot.com
Great image and templates. TFS!
ReplyDelete