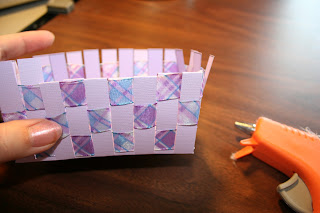
Min and I are tag teaming a little this week. I am hijacking her week to share a tutorial with you on how to make the basket that I used for my Marvelous Monday project.
One little catch though....you have to come back on Friday to grab our free template during our Fabulous Freebie Friday!
So...gather your supplies.
You will need: A piece of cardstock that measures 8 1/2 by 11 inches
Glue - I used a low temp hot glue gun
Ribbon - my ribbon is about 1/2 inch wide
Our free template - Available Friday
To get started I am going to show you how to place the template into a Word document. There are many ways to print your template, but I think that many people use Word. Of course the beginning of this tutorial works for any image. So I hope it is helpful to see these steps.
This template is made to fit on an 8 1/2 by 11 inch piece of paper. But it is constructed in landscape format. So first we will change our page layout in Word to Landscape. 1st click the Page Layout tab, then click Orientation, and finally click Landscape. Now your paper on your screen is 11 inches across the top and 8 1/2 inches tall.
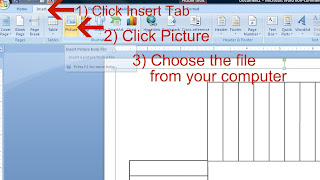
Now we are ready to insert our template. Click the Insert Tab, then click Picture, and finally choose your file from your computer. You will now see the template on your page in your Word Document.
I always do these next steps when working with an image in Word. Follow these steps to make resizing and placing your image easier. 1st click the Page Layout tab, then click the Position button, and last click Tight. You won't see much change on the screen, but believe me it will make our next steps much easier.

Now we are ready to drag our image handles to get the image onto the page as we want it. For this template you want the control handles and lines to be as close to the edges of the paper as possible. Drag the control handles on each side of the page until you have the template placed as you want it. *TIP* - Be sure to click Print and then Print Preview. Just to check that the template hasn't gone past any margins. I always have my margins set to .3 on all 4 sides of my paper. Just click Page Layout and then click Margins to change your margin settings. *Another Tip* - Save your file as a .doc file. Now the next time you want to use the template you can just go right to the document and print it off.

After you have printed your template you will want to cut it out. Save the pieces you cut off because we will use those later. I used my trimmer to cut all 4 sides and then used scissors to cut the corners out. After you cut the corners you will want to cut each of the strips. Be careful not to cut the center square. We will be scoring along this square as shown in the following picture.
Now fold all of your little cuts up. Notice that the printed side of my template will become the inside of my basket.
Begin weaving your ribbon. The best way to do this is to wrap the end of your ribbon around one of the cuts. Hot glue the ribbon on the inside of the basket.
Confession time. :) Why do my tutorials always have a confession? Yep...I messed up. Evidently I need to go back to the Weaving 101 Class. Weave the ribbon completing one complete rotation of the basket. When you reach the paper strip where you started just cut the ribbon end. Hot glue the end on that same strip where you started. *Tip* - to hold your ribbon I would suggest hot gluing once on each side of your basket as you weave. Be sure to hot glue on the inside of the basket.
Now we are ready to start the second round of weaving. Be sure to pay attention to the pattern of weaving as you choose which paper strip to wrap. Glue as shown for the first round. End round two as shown above. Continue weaving until you have about 3/8 of an inch of the paper strips left.
Now fold down all of those little strips of paper that extend above your weaving. *Tip* The next time that I make a basket I will measure and create a straight line for these folds. This will help create a more uniform basket.
Remember those strips that we cut off when we cut out the template? Here is where we will use them. Unfold all of the folds you did in the last step. Hot glue a strip of paper on the inside of the basket. The exact measurement isn't important. This strip will hold the top of our basket together.
Now place a little hot glue along the strip and fold over all of the little ends.
To finish your basket just hot glue a handle to the basket. I wrapped my handle with the same ribbon I used for the basket. All done. What a cute basket to hold a little Easter Grass and a little chocolate bunny.
Note from Min - it's a great day when we're both hijacking the blog post. :D I actually made one of these based on Shelly's tutorial and it's just fabulous. There will be a few mom's in our family that will get one of these cuties!
You certainly won't want to forget to stop back on Friday and get your freebie!! :o)


