WOW! Can you believe we are into JULY already!
Where's the time going?
Welcome back to Shelly's Images and another Tutorial/Technique Tuesday!
Today I have a quick, cute & easy Gift, Money or Business Card Holder tutorial to share with you!
Here is the 1st holder I made a long time ago.
Thank goodness I put the instructions inside it for safe keeping & future use!
I saw it online ... sorry I didn't write down where!
HERE WE GO!
I've used 2-sided designer paper.
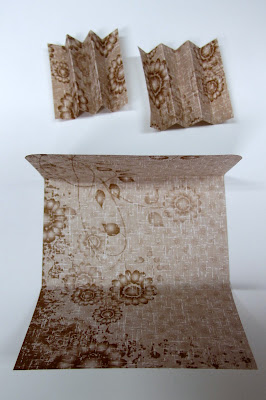
Main panel - 6 3/4" x 4" ... score one end at 2" for top flap.
Side panels - TWO at 2" x 3" ... scored every 1/2" and accordion folded.
(You can also round your corners if you'd prefer ... I have only rounded the top flap on my sample today.)
Attach Scor-Tape to each end flap on your accordion folded panels.
Then adhere as shown below:
Then fold inward and attach the other side as shown below:
For the 'closure', I find these sticky back velcro circles work perfectly!!
HINT: If you stick the neg & positive sides together when you take them out the pack ... then position it on the 'lid' where you want it ... you simply fold down the lid onto the main holder and you'll have it positioned exactly where you want it!
I find these awesome Prima sticky back studs & pearls work perfectly on the front. Either by themselves (as on my 1st sample) or with other embellishments ... choice is yours!
Suggestions for it's use . . .
1. gift card/money holder that you can send in the mail or
hand deliver
2. great for carrying along some of your business cards
in your purse
3. add a little chocolate treat or two for
each of the ladies attending your
next crafting get together
4. add a treat and love note to hubby's lunch box
5. teacher's appreciation day gift
6. stocking stuffers
7. tooth fairy pouches
etc., etc., etc!
So here's my finished sample for today!
I hope you've enjoyed this little tutorial and will give it a try! And if you do, be sure to come back and share a link with us ... we'd LOVE to see what you create!
Please be sure to come back on Thursday for the TTT challenge and to meet my SPECIAL GUEST DESIGNER! What fabulous sample creations we have to share too! Hope to see you then!!


Simple attractive and easy to made, do you have some designs of plastic card holders to share...
ReplyDeleteThis is wonderful Darlene. I always have business cards floating around in my purse. I need to make one of these. :)
ReplyDeletewat een schitterende knip grt jans
ReplyDeleteAnother brilliant tutorial and and amazing finish thank you for sharing these:)x
ReplyDeleteJust loved this tutorial! I made one for my niece's birthday money. If you want to see my poorly taken pictures, stop by:
ReplyDeletehttp://sscrafter.blogspot.com/2012/07/birthday-gift.html
I LOVE all of the tutorials on Shelly's blog and look forward to them each week!! Thank you for sharing!!
Wow, great tutorial Darlene, thanks for sharing it!
ReplyDeleteI did and thank you!!!
ReplyDeleteThis is great. Looking stunning. Can I use this for my plastic business cards also.?
ReplyDeleteYes Sweet Fairy ... you sure can!
ReplyDeleteThis is a Brilliant tutorial and easy to made.I really like it.
ReplyDeletePlastic card Printing
This comment has been removed by the author.
ReplyDeleteThis comment has been removed by the author.
ReplyDeleteThis is a Brilliant tutorial and easy to made.I really like it.a3trading
ReplyDelete