Morning everybody! Hope you are ready for another pretty fun tutorial from me! This tutorial idea is partially in response to a question someone asked me about a project I did with Shelly's Images Balloons. However, now I am applying it to this weeks Marvelous Monday Image - Minutes to Midnite!
I have been asked a few times how I color things to make certain parts opaque and other parts translucent. I thought it would be easy to explain in my emails back and forth with one or two of my blog readers, but alas it was not! So here I am with my own coloring tutorial! The funniest part of this is that I've never taken a formal Copic Class, or anyy sort of art class in many years. Pretty much all of my coloring techniques have been trial and error and trying to mimic what I've seen others do!
So for once, I'll hush and get on with the tutorial! :p
First, I gathered my supplies: My printed image of Minutes to Midnight, Copic Markers (in 0, BG10, C1,Y28, 100), Ultrafine tip Black Sharpie marker, Sakura Gelly Roll Pen (gold), Gel Writer in Clear Silver.
I also gathered a few glasses to see how light hit them when they were placed in my light box. The glass to the right in the picture looks most like the one in Shelly's awesome image, so I used that one. If you look at the glass in the picture, you will see the shiny spots where the 'natural' light hits it (actually I use a clip lamp!). Those will be shown with a slight absense of color later (You'll see!)

Since it is clear glass and champagne is not opaque, you'd see a vague colored shape of the clock behind it. So I made note of the shape in the thicker bottom of the glass where the curved glass 'bowl' meets the stem. This is important because things seen through this are concave or convex when seen through it. In this case it is convex nearest to the eye, so the clock behind it would blur slightly below the very bottom edge of the bowl. So why all this science? Simply, because not everyone can unfocus their eyes, picture the image, and color as they go along! I shaded in the inside glass curve with my Cool Shadow (BG10) Copic.
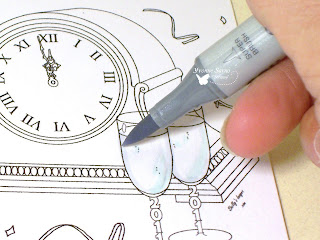
I followed that up with my C1 Copic closer to the drawn lines, especially nearest to where glass is naturally darker/thicker. (See picture to the right.)
I use a pretty light hand to start, and get progressively darker with each overlapping stroke. Copics blend very well on their own if you work quickly while the previous stroke is still somewhat wet. If you mess up, you can usually sort of bleach it out using the Copic colorless blender. Draw the colorless blender brush tip from the outside of where you mistakenly colored, and draw the color into the area wher you want the color to be. Like magic, the mark will usually lighten and disappear! If not wait 'til it dries and repeat.
I used my Lionet Gold Copic (Y28) to color in my glass below the champagne surface and used the same color to color some of the clock behind my glass. I hadn't yet decided what color I wanted the sides of the clock, so I was careful to leave the empty top of the glass clear. The darker areas of gold are where I applied the same marker with more than one stroke!
Now I'm sure if you've ever used Copics, you've found out that they don't always play well with other stamping supplies! Mix them with the wrong inks and they run together! After alot of screw ups, I learned to make this work to my advantage!
I used a Sharpie Marker to fill in the fine trim on the clock - including through the glass bowl of the glasses! Note that at the second glass I curved the color under the convex curve to make it look more realistic. It is especially evident because the clock corner meets just beyond it! ALWAYS use your Copics to color first and your Sharpies second!! Why? Simply because in one shot a Sharpie will destroy your Copics! Besides, Sharpies are ALOT cheaper and easier to replace than Copic Nibs!

Next I added a bit of color and shimmer with my Sakura Gelly Roll Pen (not sure of the color name - but it's gold tone). Again, I added more color along the outside edges, and left few spots of darker shimmery shading where the 'bubbles' would be! In this picture you can see how my coloring isn't perfect, but I can easily fix that later with my Colorless Blender. You can also see how the Sharpie and Copic are feathering together to make the clocks base behind the 'Champagne' vaguely visible through the translucent gold.
Next I added some silver gel color with a gel writer pen. Since this gel is mostly opaque, I used yet another of the 'Mistake Techniques' I picked up...
I smeared the gel ink so leave a barely there shimmer across my champagne surface. As odd as it seems though, this can be tricky! It you go over the lines of the image or get the gel ink anywhere you don't want it - it is NOT usually fixable!
I usually use alot of different colors in one image. But silver and gold together are just fantastic when used right! What better to show this on than in Champagne!
Once I'd decided which color I wanted to use on for the clock case, I shades in the glass above the champagne level with my Cool Shadow Copic (BG10). I knew I was going to color over it with another color - at least in some parts. However, I've learned that base coloring it with the Cool Shadow makes the other color lighter in that area without adding color or using a different marker for shading.
Once I colored the 'glass' and quickly grabbed my Lionet Gold Copic (Y28) and colored in the clock case behind the glass. I used two to three layers of marker strokes on the case, and 1 stroke over the 'glass' where you would see the clock through it.
I also shadowed a darker line where the gold beveled edge of the clock would be seen through the champagne glass. The Champagne is VERY shimmery, but you won't be able to tell from the picture yet. It is still a tiny bit wet and I'm trying to be careful as to not smear it!
Next, I added a ring of Cool Shadow around the base of each glass and drew a slight shadow in front of the clock. I would also later add another layer of shading with my C1 Copic. Are you starting to see the depth in the picture after just a few tricks?
Once my shimmery Sakura Gelly and Gel Pens were dry, I was able to handle the image alot easier! I've turned the image on an angle and directed my un'natural' light on it to show you the shimmering champagne color! What do you think? Does it look real enough?
After completing the coloring on the rest of the clock, I die cut and added all of the rest of the embellishing I'd decided on. Then VIOLA! I was done with my card below! I'd appreciate any comments on this tutorial and on my card either here or on
MY BLOG. Thanks! Scrappy-SI DT Family
Don't forget Thursday's TTT Challenge is still open!
Click HERE to check out the details


