Tuesday, July 31, 2012

Tutorial Tuesday! Let's Have A Ball For Christmas!

Hello everyone! Are you ready to have a ball?! If so, then I have the tutorial for you!

Today, we are going to make a fun christmas ornament using digi images! How fun is that?
Are you ready to get started?!  Okay, let's go!


Supplies You Will Need

One clear glass (or plastic, if you prefer) Christmas ornament
Scissors
Acetate Sheet
Digi Image
Markers
Fishing Line
Tiny Hole Punch
Ribbon
White Glitter (Optional)
Funnel (If Using Glitter

Pic Of Supplies Assembled


The first thing you want to do, is to color your image, then cut it out, using fussy cutting.  Next, cut out a piece of acetate, to fit inside your ornament.  TIP: If you want your image not to move inside the bulb, cut the acetate only slightly smaller than the bulb.  If You'd like your image to dangle and swing freely inside the bulb, cut your acetate 1/4 - 1/2" smaller than the bulb.

Once You have colored your image and cut your acetate,  adhere your image to the acetate piece.  Be sure you use a very sticky adhesive!  I used glossy accents, as I have found this works best, since you will be manipulating this piece a bit, later.  Allow image to fully dry to the acetate, before completing the next steps!

Once your image is fully dried to the acetate, take a tiny hold punch and punch a hole in the center of the acetate, near the top edge.  now, run your fishing line through the hole, and tie it off to hold the image securely onto the line, as in the pic below:


Now, carefully roll the acetate up into a tube, small enough to fit the opening in your ornament.


Gently slide the rolled up acetate into the top of the ornament.  Be very careful to make sure the ends of the fishing line do not slip down into the ornament.  You want the ends of the fishing line to stick out from the top.  (I suggest leaving the line very long, to avoid the ends slipping down into the ornament.


Once the acetate is inside the ornament, it will still be partially curled up. You will need to take a long thin object, such as tweezers or the blade of a pair of scissor, and slide down into the ornament to straighten out the sides of the acetate, so that it lays flat.

At this point, now you may add glitter to the inside of your ornament, if you choose.  I have chosen not to add glitter inside this one, so that the image can be the main focus.  However, if you choose to use glitter inside yours, simply take a funnel, slide it inside the opening of the bulb and pour glitter in.  It looks best if you put glitter both in front of, and behind, the image.

Now, we are ready to cap our ornament.  Remove the metal hanger from the ornament cap.  Run the ends of the fishing line through the holes in the ornament cap.  One end in each hole.  Once the fishing line is in, pull it all the way though and tie it off in a knot, on the outside of the cap, to secure the acetate inside.  far you pull the fishing line through, will determine how much "wiggle" ability your image has inside, so play with it and decide the look you like, before tieing the fishing line.


Easy so far, right?! Oh and wow, we are almost done!

Take the metal hanger and slide it back into the holes in the cap, so that it fits securely into the ornament.  Once the hanger is back in place, add your ribbon through the hanger, tie it off in a bow, and voila! Your have a cute customized Christmas ornament!


So cute and Simple to make and everyone will love them! 
Every year, it is a tradition to make ornaments for my coworkers, for Christmas.
Of course, I can't give them the same thing every year, so I'm always on 
The lookout for new ideas for something different.

I think they are going to love these, and I hope YOU will, too!

Thank you so much for stopping by, today, and viewing my tutorial!  
I hope you've enjoyed your stay here and I'd love to
hear what you think of the tutorial!

Please stop back, on Thursday, for a new challenge and your chance to win
a digi prize from Shelly's Images!

Have A Wonderful Day!

Thursday, July 19, 2012

TTT Challenge Winners - What the TEXT


Happy Thursday everyone.  We are currently on vacation in Florida and we are very much enjoying some relaxing time at the beach.  But I tore myself away from vacation to come in and announce our winners for our "What the TEXT" challenge.  As many of you probably know by now, I am a sentiment junkie.  I am not sure when my addiction to sentiments started, but I just can't get enough of the meaningful, and quirky, and funny, and loving, and...and...and....well, you get the idea.  I LOVE sentiments.  And everyone who entered our challenge this week really put those sentiments to good work.

The Gold Medal Award winner is Regan from Charmed Stamping
Regan, the DT and I truly loved this project.  The sentiment is awesome and just perfect for this TEXT challenge.  Great, great, great work!  I will be emailing you very soon with your $6 gift voucher.  Please also be sure to grab your Gold Medal Badge here.

Our Silver Medal Award winner is Ellen from ScrapEllen.
Wow, Ellen.  You made our job this week difficult.  Your project is truly stunning too.  The sentiment is also just perfect.  I love all of the detail with the flowers and those beautiful butterflies.  And I love your addition of the cut out grass popped up in front of the image.  A true work of art!   Please be sure to grab the silver medal badge to display at your blog.  You can find your badge here.

And, Our Bronze Medal Award winner is Betty from Crafting with Betty.  Betty, once again we loved your sentiment.  So meaningful.  And the stitching and beautiful flowers are the perfect addition.  We also loved the colors on your project.  Please be sure to grab the bronze medal badge to display at your blog.  You can find your badge here.

Thanks again to everyone who entered our challenge this week.  It is so, so, so hard to choose one Gold Medal winner.  Please be sure to join our new challenge which begins today.  And remember that our challenges are now on a new schedule beginning every 1st and 3rd Thursday of the month.  So you have more time to create and enter.  We can't wait to see what you create.  

TERRIFICALLY THRILLING THURSDAY: SHOW US WHAT YOU GOT - Christmas Edition

Welcome back everyone!  
Before I tell you about today's Terrifically Thrilling Thursday Challenge, I'd like to remind you that our challenges at Shelly's Images are now FORTNIGHTLY!

Our challenges will now be offered on the 
1st and 3rd Thursday 
of each month.
In our sidebar you can still see our upcoming challenge themes/dates and NOW you can also see the dates for the upcoming Tutorial/Technique Tuesday postings.
We have another exciting announcement ... we are celebrating
CHRISTMAS IN JULY
with a fabulous  40% off all Christmas digi stamps... see the advert below
NB : You will need to type in the code "ChristmasInJuly" when checking out to receive your sale price.

Now onto today's challenge
 (which will run through August 1st).
SHOW US WHAT YOU GOT! Christmas Edition
(which is our way of saying 'ANYTHING GOES' only for this challenge we are asking that you make a Christmas project)
 and today's featured image is 'NATIVITY'

I am proud to announce the Special Invited Guest Designer for this challenge ....
 
 In a nutshell, Margy is a Christian, widow, mom to 3 beautiful daughters, and granny to 4 absolutely delightful, grandchildren. She was born in the UK in a small town called Tunstall, one of the 5 “pottery” towns in Staffordshire.  Her dad made a bold decision just after she was born, to emigrate to South Africa, and she therefore considers herself as a South African, with British and Dutch blood lines.
Her crafting life took off just after she was married, and Margy has probably tried every new craft that has hit the South African scene! However it was only after she turned 55, that she attended oil painting classes. Apart from painting, her other interests/hobbies are genealogy (already traced her family lines back to the 1600’s), scrapbooking, restoring wooden furniture, mosaic, and now card making and digistamp designing.   Her day job is a locust researcher (yes, the insect with 6 legs), as well as the Project Office Manager for a South African research organization.

You can visit Margy's blog here

  Now let's see what Margy and the Design Team have created to inspire you . . .

MARGY created a little stable scene 
  
AMANDA created this beautiful card with perfectly matched DP's

DARLENE created this masterpiece with the gorgeous festive DP's and embellishments

SAMMIBUG created this skillfully coloured card, certainly a study in elegance

and finally, JEN (that's me) created a card using the Tuesday tutorial on the SI blog here


We hope you'll come join in our Show us What You got! Christmas Edition challenge fun this week.
You will have from July 19th through August 1st to submit your entry and
all winner's will be announced on August 2nd

AND ... don't forget ...
Besides a $6 Shelly's Images Gift Voucher to one lucky challenge participant ...
You can also win a $3 Shelly's Images Gift Voucher by leaving a comment at 
and

You can find our rules in the sidebar but here's a quick summary:
  • DIRECT Link to your blog posting
  • Shelly's Image NOT required
  • Follow the theme
  • FIVE entry limit
  • No backlinking
  • Entries for this challenge must be submitted
    by 12:00 noon CST on August 1
Now it's YOUR turn!
READY ... SET ... LINK

Wednesday, July 18, 2012

TEN MINUTE MULTIFOLD CARD : A TUTORIAL

So we all love those multi-fold cards but seldom attempt them because there is just so much measuring, cutting and confusing instructions, right?

Well here is one that takes just ten minutes to do, with no fancy cutting or confusing folds ...

Here are the instructions:


And that's all there is to it ....

Please remember to pop back tomorrow for our next fabulous challenge, and you'll get to see the inspiration card I made using this tutorial.

We also have a Special Invited Guest joining us for the challenge, but just who it is will have to remain a secret until then ....

Thanks for visiting, see you tomorrow!

Jen Leeflang
Shelly's Images Design Team


Thursday, July 5, 2012

TTT Challenge Winners - Stars, Strips, and SPARKLE


Good morning everyone.  If you are one of our friends in the United States then I hope you had a wonderful 4th of July with your friends and family.  We had a very quiet little celebration here at home, but still went to bed entirely too late last night.  Holidays in the middle of the week sure make it hard to get up and get to work the next day.

Here are our winners for our Stars, Stripes, and SPARKLE challenge.

The Gold Medal Award winner is Olivia from ORM Crafty Nights
Olivia we think that your project is just perfect for our challenge.  Your papers are fantastic and the bling really sets everything off.  I will be emailing you very soon with your $6 gift voucher.  Please also be sure to grab your Gold Medal Badge here.

Our Silver Medal Award winner is Stephanie from Steph's Scrap Happenings.
Stephanie, we loved the clean and simple approach to your card.  The die cut shape that the image is on really makes the image and sentiment stand out.   And the red, white, and blue twine is the perfect finishing touch.  We just loved it.  Please be sure to grab the silver medal badge to display at your blog.  You can find your badge here.

And, Our Bronze Medal Award winner is Carol from Domestic Goddess Crafts.  Carol we loved how you incorporated stars and stripes into your project.  And the sparkly swirls are perfect.  The image really stands out being cut out and placed on the star.    Great job!  Please be sure to grab the bronze medal badge to display at your blog.  You can find your badge here.

Thanks again to everyone who entered our challenge this week.  Please be sure to join our new challenge which begins today.  We can't wait to see what you create.  

TTT Challenge & Announcement

Welcome back everyone!  
Before I tell you about today's Terrifically Thrilling Thursday Challenge, I'd like to share a few changes we are making here at Shelly's Images effective IMMEDIATELY!  

First and Foremost, we are switching our challenge time frame to TWICE A MONTH ...

Our challenges will now be offered on the 
1st and 3rd Thursday 
of each month.

In our sidebar you can still see our upcoming challenge themes/dates and NOW you can also see the dates for the upcoming Tutorial/Technique Tuesday postings.

Now onto today's challenge
 (which will run through July 18th).

"WHAT the TEXT"
(Use text [sentiment] on your card/project.)

and today's FEATURED IMAGE is "DAISY 1"

I'm thrilled to tell you I have a 
SPECIAL GUEST DESIGNER today!  
Please meet Sue (who actually goes by SASSY)  

Sassy is a '50 Something' lady from Midlands, United Kingdom and her style is fabulous.
Be sure to pop over to Sassy's blog, check out her beautiful work and leave her some love.  She will be offering a GIFT VOUCHER for Shelly's Images Store to one lucky commenter.

Here's a few words from Sassy:
  I started making cards 10 years ago ... started with a shoe box of bits and ended up with a room full.  I love doing commissions as it gives me a challenge and love  to see people happy with what I made  for them.  I have been described as chocolate boxey and ultra feminine but my style is different with my vintage.  I think I'm just a pure romantic at heart and have always loved art from an early age.

 Now let's see what Sassy and the Design Team have created to inspire you . . .

has created this beautiful, vintage card of encouragement,
 with a sweet matching tag.


 has created a soothing sympathy card that would uplift anyone's spirits.

created this beautiful floral Thank You with a touch of sparkle that is sure to bring a smile!

has created a card with such beautiful vintage flair it certainly
makes you want to celebrate days-gone-by!

What a fabulous idea for decorating the lid of a gift box!
Very creative!

created this "Happy Day" card with a bit of Bling - who wouldn't have a happy day receiving this?

 has overlaid Shelly's 'Thinking of You'  image (coming to the store soon!) on the beautiful 'Daisy1' image (in Word) to created this happy card.


and also created a 4"x6" 'TAG card' 
(be watching for an upcoming tutorial),
 with matching inside sentiment.


We hope you'll come join in our WHAT THE TEXT challenge fun this week.
You will have from July 5th to July 18th to submit your entry and
a winner's will be announced on July 19th.

AND ... Don't forget ...
Besides a $6 Shelly's Images Gift Voucher to one lucky challenge participant ...
You can also win a $3 Shelly's Images Gift Voucher by leaving a comment at 
and

You can find our rules in the sidebar but here's a quick summary:
  • DIRECT Link to your blog posting
  • Shelly's Image NOT required
  • Follow the theme
  • FIVE entry limit
  • No backlinking
  • Entries for this challenge must be submitted by 12:00 noon CST on July 18th
Now it's YOUR turn!
READY ... SET ... LINK


Tuesday, July 3, 2012

Gift, Money or Business Card Holder

WOW!  Can you believe we are into JULY already!  
Where's the time going?

Welcome back to Shelly's Images and another Tutorial/Technique Tuesday!
Today I have a quick, cute & easy Gift, Money or Business Card Holder tutorial to share with you!

Here is the 1st holder I made a long time ago.
Thank goodness I put the instructions inside it for safe keeping & future use!
I saw it online ... sorry I didn't write down where!

HERE WE GO!

I've used 2-sided designer paper.
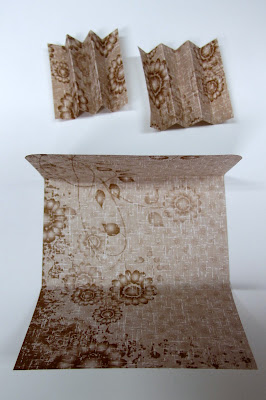
Main panel - 6 3/4" x 4" ... score one end at 2" for top flap.
Side panels - TWO at 2" x 3" ... scored every 1/2" and accordion folded.
(You can also round your corners if you'd prefer ... I have only rounded the top flap on my sample today.)


Attach Scor-Tape to each end flap on your accordion folded panels.

Then adhere as shown below:

Then fold inward and attach the other side as shown below:

For the 'closure', I find these sticky back velcro circles work perfectly!!

HINT:  If you stick the neg & positive sides together when you take them out the pack ... then position it on the 'lid' where you want it ... you simply fold down the lid onto the main holder and you'll have it positioned exactly where you want it!

I find these awesome Prima sticky back studs & pearls work perfectly on the front.  Either by themselves (as on my 1st sample) or with other embellishments ... choice is yours!

 Suggestions for it's use . . .
1.  gift card/money holder that you can send in the mail or 
hand deliver
2.  great for carrying along some of your business cards 
in your purse
3.  add a little chocolate treat or two for 
each of the ladies attending your 
next crafting get together
4.  add a treat and love note to hubby's lunch box
5.  teacher's appreciation day gift
6.  stocking stuffers
7. tooth fairy pouches

etc., etc., etc!

So here's my finished sample for today! 

I hope you've enjoyed this little tutorial and will give it a try!  And if you do, be sure to come back and share a link with us ... we'd LOVE to see what you create!

Please be sure to come back on Thursday for the TTT challenge and to meet my SPECIAL GUEST DESIGNER!  What fabulous sample creations we have to share too!  Hope to see you then!!


Sunday, July 1, 2012

Spotlight on.....

Patriotic/4th of July

Looking for some inspiration for those Patriotic or 4th of July projects.  Check out this amazing project by Min.


B-E-A-UTIFUL!

Min has more information on how she made her card at her blog.

Remember to check out our labels section in the right sidebar for more labels and categories.  We have lots of inspiration to help you with any project you are working on.


A Stella Says Sketch challenge with our Friends.

Can you believe it’s July 1st??

And better yet, it’s July 1st and we get to play along with another episode of the Stella Says Sketch Challenge with the Bugaboo Stamps gang.

So, interested in this week’s sketch so you can get started?

We got to play with some Fun Bugaboo Stamps digis this week too


Jen Leeflang featuring 3 of the images in Tall Jungle Blocks Mini Set

And Min from Bugaboo Stamps whipped up a surprise card with the SI Presents image
Min featuring Shelly’s Images Presents

So, what’s in it for you??
Like these projects? Want to do some SERIOUS WINNING??

The rules are simple: Create a Project based on Stella's Sketch above and post a link to it on Bugaboo Stamps' challenge blog, Catch the Bug, by 7/15/12 at 6:00 AM EST to be entered a random drawing for FOURdigi prize packs – TEN (10) (using a Bugaboo image only), SEVEN (7), or FOUR (4) using any image and a prize pack from Shelly's Images too. 
So, COME PLAY WITH US!!! =)
Hugs & Happy Days!